The new London Routemaster bus came into service in 2012. It is a three door design with a hop-on hop-off capability. The rear door can be left open when a conductor is on board. The vehicle is a hybrid with a Diesel engine charging batteries. The batteries then power traction motors. Power is also recovered by regenerative breaking.
The model
Presentation
The box is the usual Oxford card outer covering a perspex enclosure. These would make good display cases if it was not for the moulding mark at the top. The model is secured to the black plastic base using minuscule screws.
There is a remarkable amount of detail with most of the signage legible. There is a full interior including cab detail.
The chassis is metal while most of the body is plastic. Wheels are functional and nicely detailed also, the window surrounds are printed.
Roof detail includes the Helicopter viewable ID number. The letters indicate the operator, in this case the Go Ahead Group and the fleet number follows.
These are amazing little models with no significant errors. Great for under £15.
The first Jaguar car in the Dinky range was the generic “sports car” of 1940, the 38f. This was probably based on the SS 90 of 1935. The model had a blue or khaki body. There was also a red variant and a scarce green version.
The Jaguar XK 120 model came out in 1954. Numbered 157. It was available in green, white or red. In 1960 two, two tone schemes were issued. Cerise/yellow or grey/yellow.
The XK 120 was the first post war sports car from Jaguar, appearing in 1948. it had a top speed of 124mph. The engine was a straight sis with 160bhp.
In 1958 The D type was issued in turquoise blue, with a driver figure.
The Jaguar Mk II model came out in 1960, numbered 195. it was available in maroon, cream or gray.
The Jaguar E type appeared in 1962, numbered 120. This model came with windows and a removable roof. You could have red or blue.
The jaguar Mark 10 came out in 1962, in blue, numbered 142. The mark 10 was over 6 feet wide and was the broadest car on the market in 1961. it had distinctive dual headlights and disc brakes.
In 1968 another E-type variant was produced. This had a fixed roof with opening doors and bonnet. By this time Competition from Corgi and Matchbox was fierce. More working featuring were introduced in response. The packaging was also modernised.
The last Dinky Jaguar was the X15 numbered 219 and issued in 1978. This featured some fairly ugly decals and represented the desperation that was setting in!
Finally there was also a Jaguar Police car and a tie in with Avengers TV series.
The Tri-ang 3F tank locomotive, “Jinty” was produced from 1952 until the mid 70’s. The version shown in the featured image was made between 1957 and 1959. It has the early BR crest and is lined. It has the early hook and bar coupling.
From the British Model Trains Catalogue, 2002 edition
Originally the model had an unlined black livery with British Railways spelled out in words.
The earliest version of the Triang Jinty from 1952
The prototype
The origins of the 3F Jinty locomotive date back to 1899. They were built to a design by Johnson of the Midland Railway. Later Fowler of the LMS modified the design and over 400 were built between 1924 and 1931. Various manufacturers built them including the Ex Lancashire and Yorkshire works at Horwich.
They were numbered by the LMS from 7260 to 7681. British Rail simply added a 4 prefix. the model has the number 47606. Withdrawals began by 1959 although some lasted until the end of steam.
They were also used for light passenger and short trip duties.
The model
The body is made out of moulded plastic, early versions being made of acetate. The whistle is also painted plastic. It is quite a hefty beast at 212 grams. Buffers are plastic with a painted buffer beam. The motor intrudes into the cab and there is a rather prominent screw in the chimney. Hand rails are moulded and not picked out. Also the number on the smoke-box door is present but should be picked out in white.
Photo by the author
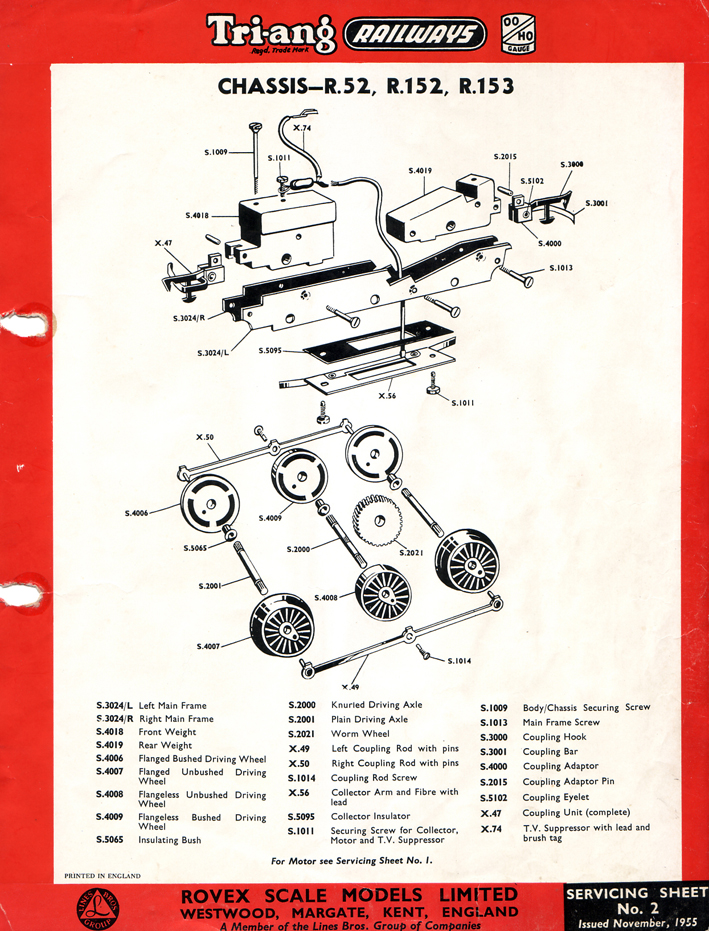
The chassis used is the R52 with phosphor bronze pickups and brass gears, this chassis went through various revisions. Many thousands of this model were made. They usually run well if kept oiled.
Photo by the author
The Jinty is seen here in the 1961 catalogue, as part of a train set. It has the later BR crest. Note, the shunter uses the same chassis.
Catalogue scan by the authorThe RS.4 set with series 3 track. from Triang-man
Here we see a scan from the December 1961 edition of Model Railway Destructor. The price of the RS.4 set is approximately £5, which is £112 in today’s money. This was affordable to most families. Note the monthly terms for the less well off.
Model Railway Constructor Dec. 1961 – Scan by the author
As a bonus two early Rovex LMS coaches are shown. These were made in 1950 for the original Marks and Spencer train set. Only 6″ long, they are remarkably crude and toy like. However the bogies are made of metal, with plastic wheels. There is no interior seating. Oddly the buffers are also metal. The amount of play on the bogie pivots is enormous, this gives them a rather comical wobble in operation. They were available until 1956.
Photo the authorFrom the British Model Trains Catalogue, 2002 edition.
The Warszawa was a Polish vehicle built from 1951 to 1973 by the FSO Passenger Automobile Factory in Warsaw. Originally based on the Opel Kapitan of 1938. The design similarities are apparent in the 1951 version.
They were popular due to their “bullet proof” design, capable of handling bad roads, bad fuel and heavy use, hence their popularity as taxis.
Yorkdale is a 00 layout set in the 1960’s, it represents a fictional line that would have run from Grassington up Wharfedale to Hawes, in the Yorkshire dales. The line was proposed but never built. The baseboard is 6′ x 4′ with three ovals.
The coal sidding.
At the front of the layout there is a siding. The high ground on the right is made of 10mm polystyrene sheet covered in plaster bandage. It was then painted green using a match pot. The ground cover is Javis moorland mix scatter.
Track was ballasted using the technique here. Ballasting track – top tips. The track was first painted using humbrol dark earth enamel. The top of the rails were then wiped off.
The ballast bin buffer stop
The ballast bin buffer stop was made form a Wordsworth models download as was the hut. This is a cheap way to provide these useful items.
Backdrop
The backdrop is from ID backscenes. These are high quality and good value. Read about the best backscenes here. The road is just painted on to the baseboard . Vehicles are from the Oxford range.
The class 121 Bubble cars were built from 1960 by the pressed steel company of Oxford. They were double ended with a cab at each end. A class 121 was still in use in 2017, on a heritage line. They had a top speed of 70 mph and were used mainly on the Western Region. Lightly used lines in Cornwall being their main area of operation.
The class 122 was similar although built by Gloucester RC&W in 1958. They also made a further nine single ended trailers.
The model – £99 approx.
The amount of detail for the price is amazing. The masking is crisp and the under frame painting adds a lot of visual appeal.
The height of the floor is a compromise and adding a few passengers would help to disguise this. Separately fitted detail includes windscreen wipers and handrails. The glazing is flush and has printed details. Door handles are picked out in silver.
Running
Certain versions of this model had problems with the bogies catching on the chassis detail, causing derailments. The version tested here did not have this problem. In fact it ran OK on first radius curves!
The gearing is low so that in runs slowly, even at half speed on the controller. The model does speed up once the lubrication warms up.
The model is Named Thunderbird 1
Thunderbird 1
Lighting
As a consequence of the low gearing the lights ,on DC, are rather bright even at medium speed. The cab ,carriage, head and tail lights can be switched off by internal switches. They are on by default, on the DC version. All the light can be controlled individually on DCC.
Conclusion
The model is great value and runs well once it warms up. It ran using an ancient Triang controller with no problem.
In the Greenwood produce a range of good value, laser cut kits. The shop reviewed here was £6.00 with free shipping.
On opening the nicely presented box, you get the unmistakable waft of burning wood! There are some rather thick plywood parts and a sheet of instructions. No glazing is provided. The chimney parts are bagged separately.
The build
The parts slot together well and are a good fit. I had an issue with warpage on the side walls. A block of balsa glued to the inside fixed this. Press the parts under a heavy weight until the glue has set. The build progressed quickly with the shell being completed in about 20 minutes.
After assembly give the model a coat of primer. This takes paint much better than bare wood.
Painting
Paint the bricks with a salmon red colour. Try to paint the surface only. The gray primer then looks like old mortar. The woodwork was painted green. The signage and interior are from the Scalescenes high street shops download. Glazing was made from some Javis thick clear sheet. The curtains are just an off cut of purple card. Some weathering was added to the roof.
To add depth use some thin card to make the window lintels.
Conclusion
This range is great value for money, the only caveat is the warpage problem and the thickness of the wood parts. The roof ,wall thickness and barge-boards are over-scale to a large degree. It would be fairly easy to replace the roof. This would probably be a good idea anyway, if you are making a row.
A thin shim of brick detailing for the front of the chimneys would also be a good idea. Finally, adding some glazing material would be helpful for beginners.
The oldest method is to use grain of rice or grain of wheat bulbs. Grain of rice bulbs are a tiny 2mm x 6.5mm. Grain of wheat bulbs are 3mm x 7mm . They are quite current hungry at 30ma and 50ma each respectively and run at 12V. The four bulbs used in the shops model take close to 100ma in total !
Grain of rice bulb
Filament bulbs give a warm yellowish light which simulates gas lighting, if used on a lower voltage. The main problem is reliability and inaccessibility. If one blows they can be impossible to replace in some cases.
LED lighting
LEDs are much more reliable and use less power. White LEDs can be a bit harsh giving a much whiter light than filament bulbs. There are now many sizes from miniscule “chips”, to over 10mm in diameter. The most common size for model buildings is 3mm. You can use yellow LEDs to simulate gas lighting.
The voltage required for LEDs varies depending on the colour. You will need to use a resistor to run them on 12 volts. The voltage needed for full brightness is usually referred to as Forward Voltage or Vf. The current is usually set at 20ma. The table below gives an approximate guide. you can increase the resistance to reduce the brightness.
Colour
Vf
Resistor required for 12v supply at 20ma( full brightnes)
White 3mm
3.3
470R
Yellow 3mm
1.8
570R
Yellow Green 3mm
1.8
570R
Red 3mm
1.8
570R
Full green 3mm
3.3
470R
Light blocking
Card buildings are the easiest to light as the card tends to block light. However plastic kits need more attention. Paint the insides of the walls black. You may need to make a light box around shop windows, out of styrene. this will stop any light bleeds. Use filler to address any gaps and test with your choice of lighting, before sealing the building up!
Wiring it up
Filament bulbs usually come pre-wired . These can be threaded through a hole in the building’s base card. You can get LED’s that are pre-wired for 12v. I usually use a dab of UHU to hold them in place, or you can use hot clue.
Make up a power “bus” under the model using doll’s house self adhesive copper strips. Solder the wires from each bulb to the bus bar and then Add the wires that will go to the PSU. If you are using LED’s use red and black wires so you maintain the correct polarity as LED’s only work one way round, Unlike filament bulbs.
Powering the lights
The 12v accessory output on model railway controllers can be used. You can also use the 16v AC output with a resistor for 12v bulbs. LEDs can be used on AC by wiring another diode across the LED and adding a resistor of about 1K, for white LEDs. This gives full wave rectification, experiment with the resistor value.
Old 12v DC controllers can be used to give variable brightness.
An example circuit is shown below using two LEDs, with one reversed. This is for 8V AC, hence the 560R resistor,
If you have a camera with manual exposure. shoot with the background slightly over exposed, as most engines tend to be black or green. This will make the loco less dark.
Modern clutter
Try to avoid any modern clutter, to keep that period charm. The only thing not period in the shot below is the black plastic bin bag. You can use good photo editing software to remove such anachronisms.
Shoot stationary trains for detail shots
For detail shots wait till the train is stationary and get as close as possible.
Shoot people
Having the driver in a shot adds interest and character. Drivers usually wear overalls and, if you are lucky a “period ” cap!
Shoot in winter
The East Lancs line, was shot below ,on a very cold January day. This made the steam much more obvious . The misty conditions were very period. This could be the 1950’s !
Shoot 3/4 shots
I usually shoot 3/4 shots that is with the loco 3/4 of the way around.
Use a zoom lens
A good zoom lens will bring the action to you. Try to avoid digital zoom, this will just drop the resolution. For flower beds and trolleys, crouch down so that you can get more distant buildings in the shot. This will also add drama.
Research locations
Most lines have a guide to the best photography locations, check out the relevant web sites.
Make sure you have a timetable and find out which way the engine will be facing. On the Ribble steam railway the engine will be going backwards on the way out. This line does not have many good vantage points. One of the best is the level crossing close to the station and docks.
Javis make a range of ruined house pieces for wargamers . These are meant for 28mm or 1/56 scale . However, the scale discrepancy is not very noticeable with buildings. They are made of cast resin and need painting.
First give the casting a coat of grey primer. This will help to “key” the next coat of paint.
Stonework
Select a stone colour and paint the stonework. All paints used were Humbrol enamels. Next, with a mortar colour, paint the remaining rendering on the outside walls. The inside walls had the surviving plaster painted green. Dark earth was used for the floor of the ruin.
Detail painting
There is quite a lot of moulded detail on the casting. Wood splinters and an old door were highlighted with colour. The inside of the fireplace was painted red to simulate old brick.
The base
The base was cut from a piece of 2 mm card. Javis foliage material was used to disguise the edge of the casting. Finally Javis scatter was used for the grass.
Detailing
To add interest some Knightwing barells and crates were added. the tyres are spares from a kit.
This was a fun project using a bit of lateral thinking.
This website uses cookies to improve your experience. We'll assume you're ok with this, but you can opt-out if you wish.AcceptRejectRead More
Privacy & Cookies Policy
Privacy Overview
This website uses cookies to improve your experience while you navigate through the website. Out of these, the cookies that are categorized as necessary are stored on your browser as they are essential for the working of basic functionalities of the website. We also use third-party cookies that help us analyze and understand how you use this website. These cookies will be stored in your browser only with your consent. You also have the option to opt-out of these cookies. But opting out of some of these cookies may affect your browsing experience.
Necessary cookies are absolutely essential for the website to function properly. This category only includes cookies that ensures basic functionalities and security features of the website. These cookies do not store any personal information.
Any cookies that may not be particularly necessary for the website to function and is used specifically to collect user personal data via analytics, ads, other embedded contents are termed as non-necessary cookies. It is mandatory to procure user consent prior to running these cookies on your website.