Dinky Toys- Tankers – Price Guide

Dinky Toys History

Welcome to

Welcome to the Dinky models, tankers price guide. Under each model ,below, is a live list of the relevant models on Ebay, useful for market values. These are affiliate links that help to support this site. The actual model description has a coloured background .

Read our Dinky Jaguar cars price guide

In 1931 Mecanno LTD, makers of Hornby railways introduced a range of die-cast models. The models were ostensibly designed to complement their “0” gauge layouts. They proved very popular and by the end of the 1930’s the range had grown enormously. More than 300 models were listed, this number was never surpassed.

Two pre-war Dinky Cars from the 24 and 36 series

Dinky numbering

Before the war vehicles were given a series number along with a letter to denote the actual type. i.e the 25c was a flat truck while the 25d was a tanker. later, just numbers were used for each vehicle . .

The first Dinky tankers

This Dinky tankers price guide includes every tanker produced from 1936 to 1979.

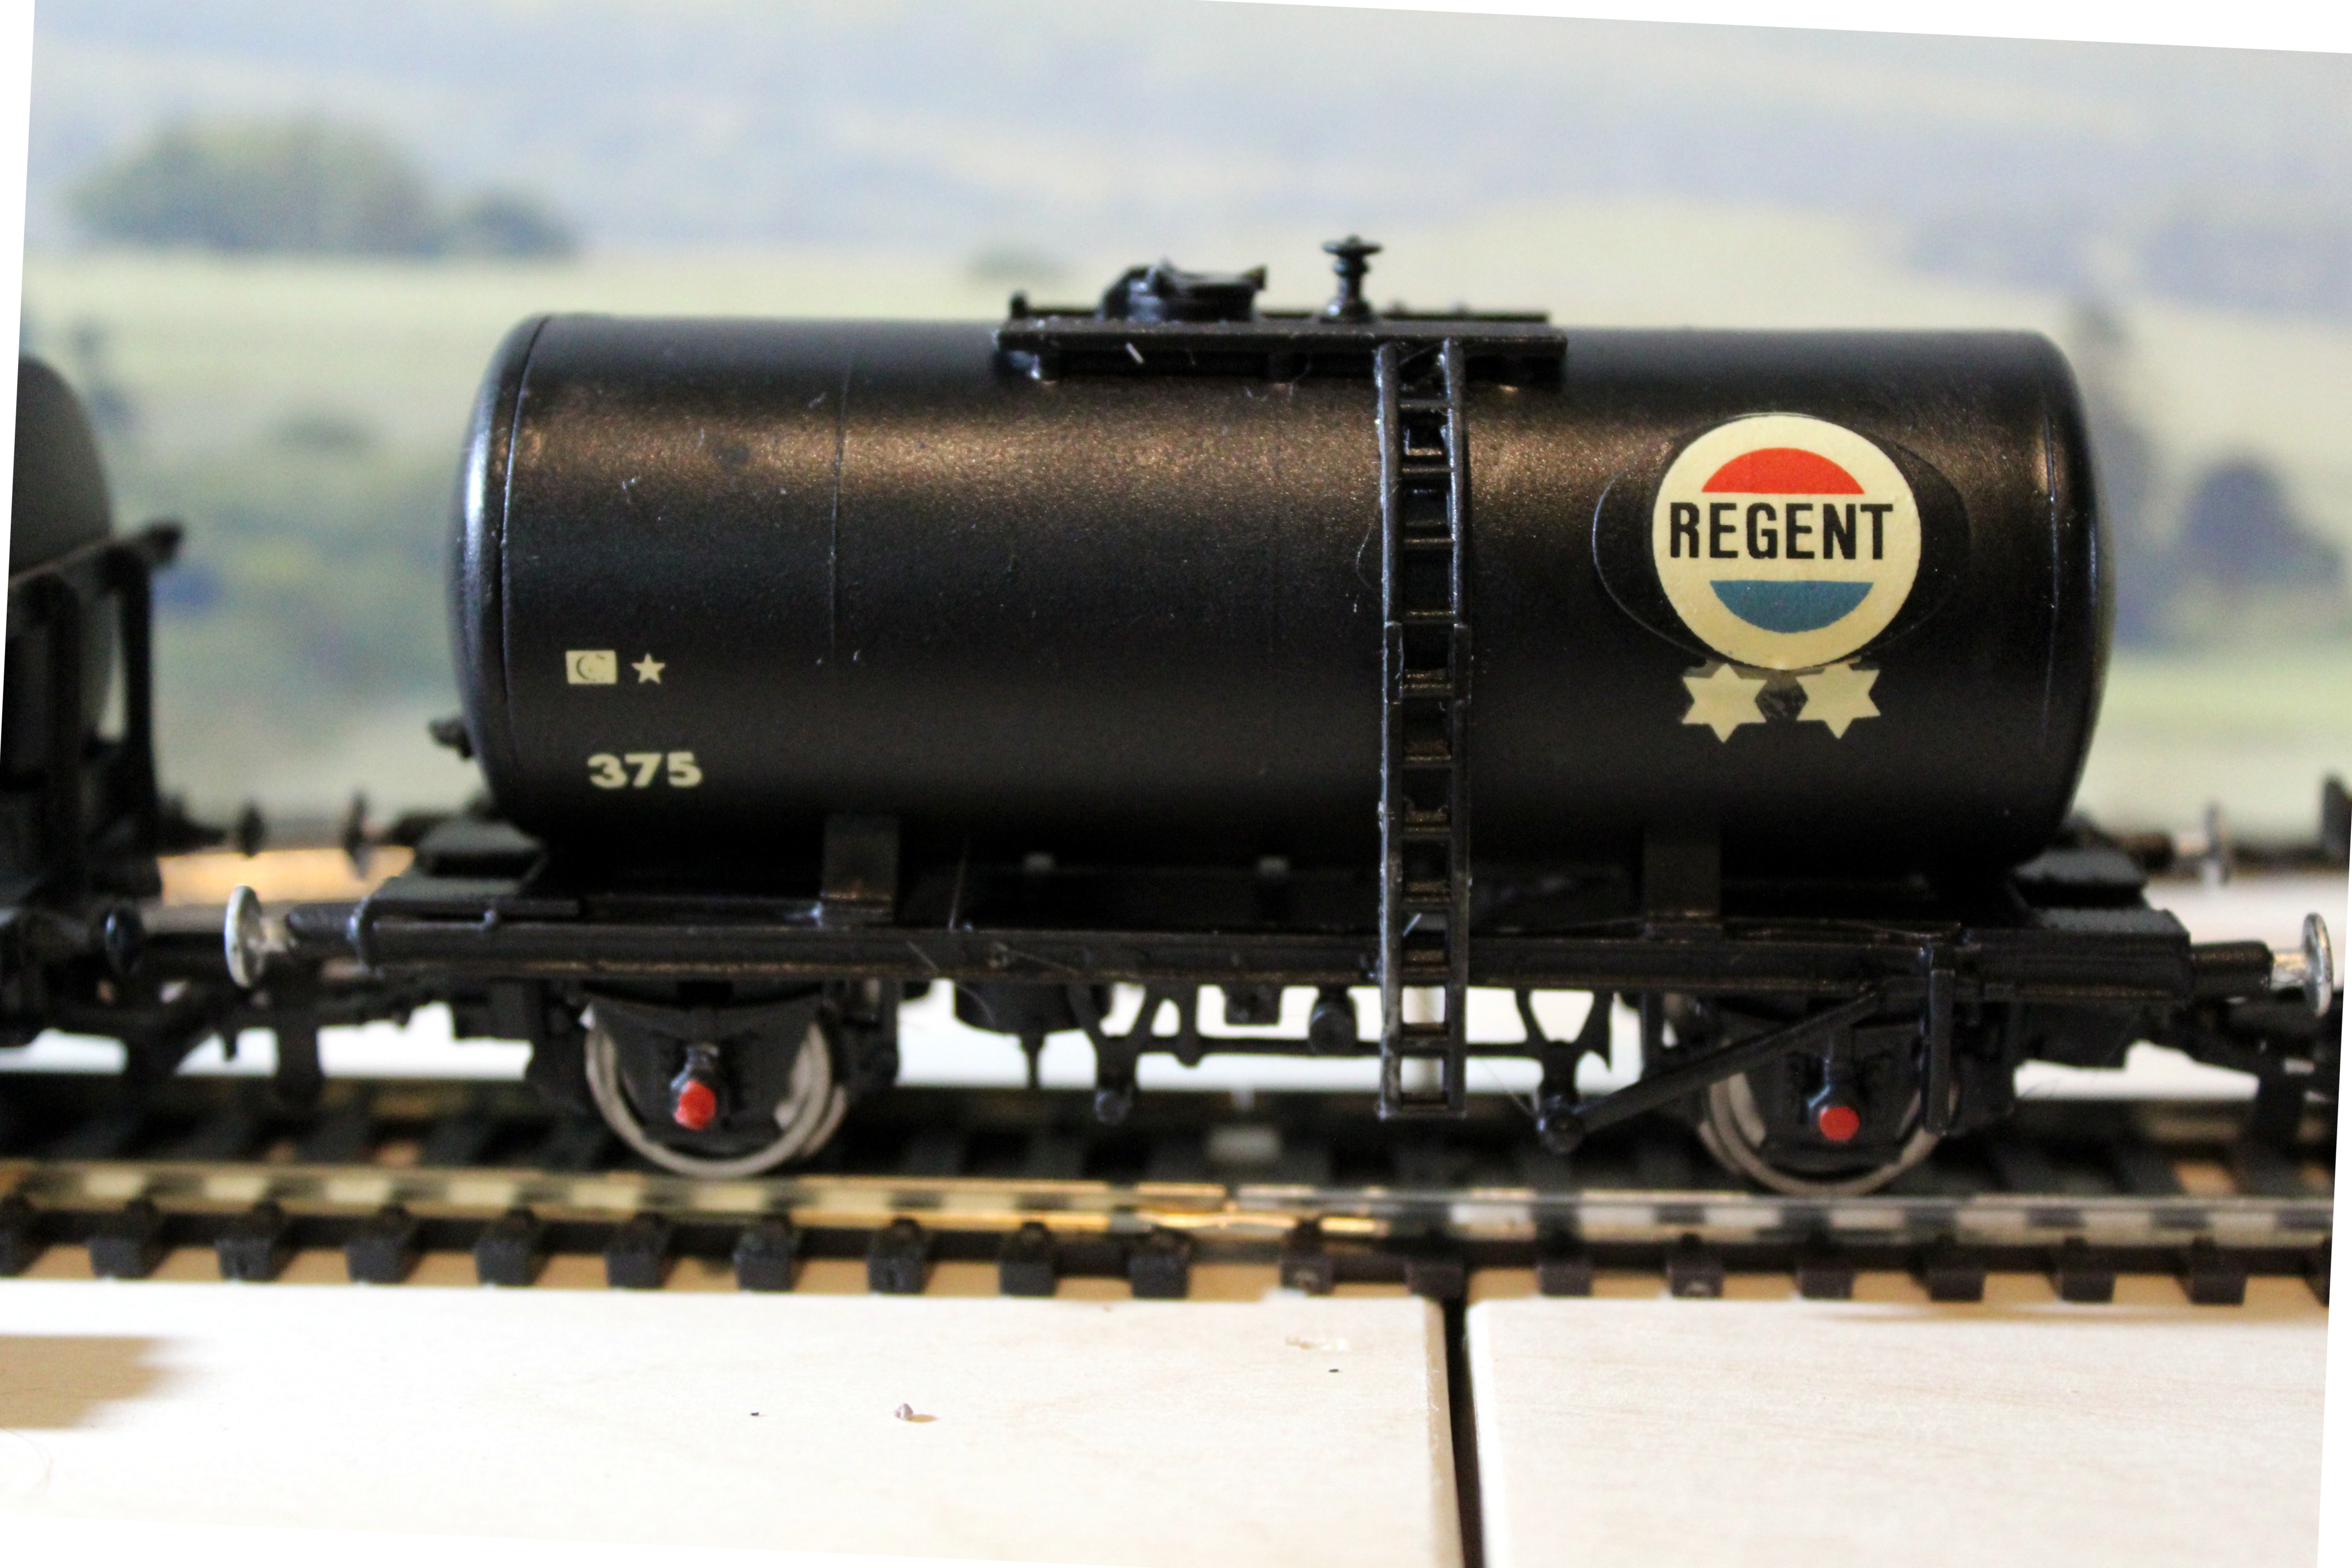
The first Dinky tanker was the 25d. this was released in 1936. Various liveries were used up until 1950. Pre-war models had white tyres.

Pricing

Post war versions can be had from £25 – £75 depending on condition. 1930’s models are harder to find in good condition and can be £200 +.


In 1936 the 33f scammell mechanical horse was issued . This also had several liveries and was the last of the pre-war tankers.

Pricing

Some of the pre-war variants can cost up to £200, later versions cost from £35, for a good clean model

The Dinky Mecanical horse on ebay

In 1948 the Foden 14 ton tanker appeared in blue livery. This was numbered 504.

The Studebaker tanker, number 30p came out in 1952, This was renumbered as 441,442 and 443, and continued on into the 60’s, although it never received windows.

The AEC Tanker came along in 1952 , seen below in the 1955 catalogue. A version of this model was the only tanker in the Dinky Dublo series, numbered 070.

1955 catalogue, page 20

The Leyland Octopus Tanker was issued in 1958, this model eventually received windows.

Atlas editions have issued reproductions of this model. see the bottom of the page

The last Dinky tanker was another AEC, issued in 1966 and again in 1978, just before Dinky shut down. This was numbered 945.

This is a fairly common model and can be had for £10 -£30.

Atlas Editions Dinky tanker reproductions

Sign up for notifications on when a new post is issued.

The Building of Yorkdale Part 1, Initial design

How cheaply can you build a model railway?

Building a model railway can be an expensive business so how do you get a good start for minimal money? I have chosen to build a traditional; 6′ by 4′ layout on a pre-made baseboard. This gives scope to run a few trains and there is some operational potential.

Subscribe to my YouTube channel, Not Just Trains.

Track design

The design is a variation of Hornby track plan 5D, with the sidings moved to the inside of the loop. There is a factory siding on the right. this will add interest.

Control Panel

I have also gone the DC route, again for cost reasons. The control panel will be housed in a commercial slope front project case. Points are controlled by Hornby passing contact point levers. The only electric points used are those that cannot be reached from the front of the layout. I am using cab control with two controllers and, on – off – on, toggle switches to control each section.

Baseboards

First of all you need a good solid base to build on. Don’t skimp on the baseboard. This was obtained from Model Scenery Supplies for £185 shipped. There is a long waiting time of 10 weeks, but they are well made and save a lot of hassle. The board comes in two halves and has a plywood top.

Period and Location

The location is the Yorkshire Dales, I have always wanted to use the Metcalfe Settle and Carlisle buildings! The era is now. The outside loop is a heritage line that has a link to the main line. This allows for steam charters to come off the heritage line.

PO336, 00 scale, Settle & Carlisle Goods Shed

Track

Track is a mixture of Hornby and Peco code 100. most of it is second hand.

Controllers

For now, I am using a couple of Hornby train set controllers.

Whats next?

Part two will be on fitting Peco point motors and wiring. I will also make some videos of progress on the layout.

I was looking for something to make soldering easier and found this on Amazon. This is great value and very useful if your eyesight is not as good as it used to be!

Follow this series on Twitter and Facebook.

What is the best glue for card Kits?

An often asked question is what type of glue do you use for Metcalfe and other card kits. I build kits commercially and have tried most types of glue. Probably the worst is standard PVA it takes forever to dry and causes warping.

There are two types of UHU glue one has a petroleum based solvent and the other is water based. The water based one also takes a long time to dry. I used The petroleum based solvent version of UHU for a long time. It sets fast and dries transparent. The biggest problem with UHU is stringing.

More recently I switched to Rocket card glue this sets fast and does not string. However it is expensive at £9.99 for 50ml. Javis make Velo-set PVA this is similar to Rocket glue, but you get more than twice as much for the same price! I now use the Javis product. No stringing and cheaper than Rocket.

Buy Javis Velo – set glue here.

Expanding a train set.

So you have bought a train set and want to know where to go next? What turns a toy train in to a layout?

Baseboards

The best thing you can do is get a baseboard. you don’t need to be a carpenter. There are several companies that make high quality baseboards. The lead time is 6 – 10 weeks. Some are made out of softwood and some are entirely made of plywood. Additionally you can get flat packed kits, made to order, at a reasonable cost. For example a 600mm x 1200mm kit is £76.

Inspiration

Exhibitions and Museums can be a good source of inspiration. The Layout below is at the Ribble steam railway. This is a simple track plan with three ovals.

Layout Inspiration

Extra Track

Ebay is a good source of cheap track Freetrackplans.com is also useful for ideas.

Track geometry can be complicated. Hornby has four different radii. It is best to follow a design done by someone else . Then you will not be buying the wrong track and expensive points.

Types of Layout.

This is another complicated subject although there are two main types, Mainline and branch line. Ovals can simulate mainlines with an up and down route. The problem with mainlines is that they need a lot of space. The minimum is probably 6′ x 4′ . Even this takes a big chunk out of a room.

Branch lines can look more realistic, an 8′ x 2′ board placed along a wall is adequate for this. The disadvantage is that you can’t just leave a train running. If you are using short wheel base locomotives it is a good idea to use electrofrog points.

Building Dapol Wagon Kits – What you need to know.

Dapol wagon kits are a quick and easy way to add to your rolling stock collection. You don’t need to be a kit building expert, just follow the simple tips below.

The ex-Kitmaster, ex-Airfix wagon kits, now available from Dapol, are a cheap way to add rolling stock. There are, however, a few issues to keep in mind when building them.

The mouldings are not exactly finescale, so just have fun!

Dapol tanker kit with borrowed Hornby wheels. It was sprayed after the underframe was assembled.

Building the kit

Contrary to what you will read elsewhere, assemble the main components before painting. It is far easier to attach small parts if they are not covered in paint. Tube, plastic cement is more than adequate.

Leave off the vacuum pipes as they will foul the couplings. You can use the buffer beam hooks but cut of the hanging chain links. The buffers will most likely need some flash removing. The brakes are probably the most fiddly things to fit. Do this last with the wheels in place, as a guide.

Painting

Firstly, assemble the underframe and tank or body before painting. Then buy a cheap spray can of matt black paint.

You can get a large can for £5, from Wilko. Use a wooden stick or dowel and clamp it onto the frame with a bulldog clip or similar. With some parts, you can temporarily glue the “handle” on. You will them be able to manoeuvre the model while spraying all those awkward corners. Use short blasts and keep the model moving. You might need a couple of coats.

Once sprayed, take a large lump of Plasticine and press in down onto a flat surface. Push the stick with the parts on it, into the Plasticine and leave to dry.

You can spray the whole underframe in about 60 seconds. Compare that to hand painting!

Weights

The best material to weight the models is good old Plasticine. It is heavy, cheap as chips and easy to keep in place. The tanker model has a “sausage” of Plasticine in the tank. Just remember to put it in there before gluing on the end cap!

Wheels

The finescale metal wheels provided, tend to fall off the track! They have a minuscule flange and would not stay on even 3rd radius curves. You should be OK if you have very good track work. I “borrowed” some Hornby wheels, and , yes, The wagon stayed upright! The original plastic wheels from the kit also seen to work OK.

Couplings

NEM Couplings are provided. You will need to remove various protuberances from the buffer beams before fitting. I cut the locating pip off them and used a small amount of epoxy to hold them on. This gives you some manoeuvring time.

Push another wagon up against end end of the kit build and connect the couplings. You can use the other wagons to keep the kit couplings at the correct high and angle, while the glue sets.

Decals

The provided decals had yellowed varnish, however,most of this washes off when fitting. when the decals have dried, give the model a top coat of matt varnish. This will make the finish more durable and seal in the decals.

You could also try some other liveries with the tank wagon using third party decals.

Setting Up a Train Set -What You Need To Know.

So you just bought a train set, looking at that lovely locomotive, you want to get it running as soon as possible. Opening the box, you are faced with a cornucopia of bits, How do you set it up? Here is quick guide that will have you running trains in no time. Screen grabs from RC Empire.

Continue reading “Setting Up a Train Set -What You Need To Know.”

How to Ballast track – top tips.

How to ballast track – ballasting the track will go a long way to making your layout more realistic. Unfortunately, it can also play havoc with your points and train running. Additionally it can take a long time. However, with a few simple tips you can get a good finish with minimal time and effort. First,lets prepare the baseboard and get the correct materials. You will need:

  • Your choice of ballast
  • PVA
  • Syringe or eye dropper
  • Ex detergent,bottle, spray type.
  • Washing up liquid
  • large flat brush, 1″
  • Black ink for colouring
  • Brown acrylic paint for weathered ballast
Continue reading “How to Ballast track – top tips.”

Modelling a “Run-Down” engine shed – Dapol kit

Modelling a “Run-Down” engine shed in plastic, Building plastic kits is more difficult than card kits. To get a realistic effect they need to be painted and weathered. The kit used for the diorama shown here is the Ex Airfix engine shed, now available from Dapol. This is an old kit that has warping problems and quite a lot of flash on the parts. However, it is cheap and makes a good project to practice your painting skills!

You can see the warpage problem on the roof, over the vents. This sad little shed has nor seen a lick of paint in many a year.

For the ,Modelling a “Run-Down” engine shed project, Look out for the Amazon product links in the text . This gives you an easy way to get the paint you need for this project. We also stock some of the items.

Where to start?

I usually start by painting the walls in the base colour. In this case Revell # 85 brown enamel. All the other paint used is acrylic. This brown will look a bit bright, but the weathering washes will tone this down. You need a good solid base coat and enamel will not react with the later water based washes.

Mortar detail and worn paintwork

Mortar technique and colour?

Let the base coat dry for at least 48 hours. it needs to set as you will be rubbing the mortar paint off later.

For mortar, I used a bottle of flesh coloured acrylic by Folkart, #949 skintone . This gives a pleasing effect and is not to bright. You get 59ml so it is great value. It needs to be thinned with a little water,so that it flows like milk

Paint the wash onto the walls,it should be thin enough to flow into the recesses. Leave it to dry for a couple of hours. Next, use a damp cloth or kitchen roll to rub of the excess from the bricks. The mortar does not need to be too neat.

Top Tip

Mixing paint

You can get plastic shot glasses to mix paint. They are available in bargain stores for £1 or less, for 20. A good mixing stick can be had by using lolly sticks, available in the craft section of most Pound shops.

Get your paint below. These are UK affiliate links, we receive a percentage of the items cost. This does not affect the price you pay.

Creating Weathered and worn paintwork.

The technique I use for creating weathered paintwork is quick and simple. Most of the woodwork for the engine shed was done with Vallejo Dark green acrylic.

This comes in little plastic bottles and is intended to be airbrushed. It is too thin to be used for hand painting, but makes a great wash. Brush liberally onto the plastic parts and it will collect in any recesses. Do this two or three times and you have old paintwork

Roof detailing a plastic kit

The roof in this kit was warped, you can straighten it out using a hair dryer to heat it up. Then press it under a heavy object, like a book. Give the roof parts a coat of FolkArt Gray acrylic. Next, when dry, dry brush some darker gray paint over the top of the slates. Finally, run a little thinned black paint so that it sits in the recesses between the slates.

Final detailing and bedding in.

One advantage of plastic kits is the detailing. This kit comes with drainpipes, lamps and a sign board. Paint these with Vallejo dark green. Paint the light up part of the lamps yellow.

Next ,make the base out of some 2mm grayboard. Fix the building down with UHU. Secondly run some white glue around the edges of the building and add some Javis Mid Green coarse grass scatter.

Thirdly, find an old piece of straight track and remove the joiners. Glue it down inside the shed with PVA. I used a wash of Vallejo dark earth to weather it. The lighter coloured grass is made with Javis meadow green scatter, or you can use one of their grass mats. The mats come in two widths and are great value.

That completes the project.

I write at least one new post a week, subscribe below so that you don’t miss any! You will receive an email with each new post.

See our other blog posts.

The Best Backscenes For Your Layout- Review

Every layout needs a backscene . Here I look at what is available commercially. Additionally, what is the cheapest way to make a simple sky backscene?

Most 00 backscenes are around 12″ or 30cm high. Commercially produced backscenes range from 9″ to 25″ high .

Make your own backscene

You can make your own sky backscenes with blue card (mountboard). This can be obtained in A1 sheets, from Pullingers art supplies. A1 is is about 33″ x 23″. To get the blue colours, you need to order 10, at a total of £33.50 plus £4 for delivery. Delft blue or horizon blue make good sky colours. The Pullingers mountboard is about 1.4mm thick.

Backscenes for your layout

Another possibility is sky wallpaper. You will also need a thin ply backdrop to attach the paper to. The wallpaper is available from Wallpaper Direct.

Sky Wallpaper

Faller backscenes

Faller backscenes are available in the UK, from Gaugemaster. They are not cheap, but the ones that are mostly sky can be used on British outline layouts. They are quite deep at 25″ high, so you get a lot of sky for £35.

Faller backscene 3880 x 650mm

Gaugemaster backscenes

Gaugemaster have their own range of backscenes. The are about 12″ high and 9′ long. They are probably the best value here at £8.50 per sheet. The paper is a bit thin but there is a good range of UK scenes.

Gaugemaster sky sheets.
Gaugemaster sky sheets

Peco Backscenes

The old favourite Peco backscenes (available from Gaugemaster) are still in production. They are quite small at 28″ x 9″ and tend to look a bit cartoon like. However there are some useful sky papers that can be used for dioramas and photography backdrops. They are cheap at only £1.55 each.

Peco Mountains
Peco sky paper

ID backscenes

Perhaps the creme de la creme of backscenes. ID backscenes are printed on heavyweight 180gsm paper . You get 10′ overall, in two 5′ rolls.

Printed with UV resistant ink, they will not fade or discolour. They come in two heights 9″ and 15″. The photography is of very high quality.

ID Backscenes

The video below takes a comprehensive look at fitting ID backscenes to a layout.